If you drag a Color4 input onto the graph, you can change its mode to “Mesh attribute” and then have access to the color attribute.  IDK about the other questions thou.
Well @HirangaG I have to admit that what you’re trying to do is not a simple one. I’ve been scratching my head on this one for a while now, but I think this might be the solution you’re looking for:
The core problem here is that you’re trying to make two different systems work together.
Thin Instances by nature are designed with MAXIMUM performance in mind. They are created so that you can throw one massive ball of craziness at the GPU through one single WebGL call.
This of course is AWESOME for performance, BUT it has tradeoffs that you have to understand.
The most important one for the sake of this situation is that Thin Instances share a material. They cannot have individual materials.
One nice thing about this is that a single material is lighter weight and more optimized for maximizing performance. Imagine if you had thousands of individual “instances” or copies each with their own material, that would get expensive very quickly. So with one Material we are ensuring the fastest rendering possible.
For part of what you’re attempting, this isn’t a big deal. Having a single node material that handles any shader effects for the entire group of instances is actually a great thing. There’s only one single Node Material to create within.
Obviously where this gets SUPER difficult is when you want anything unique to happen to any given instance.
Because they must share a material, you’re forced into a pretty interesting corner. Anything that happens to the individual instances HAS to be built INTO the material (shader).
So the path you’re going down of giving each instance an individual color (not material) works, because instances can have individual colors. HOWEVER when you add a node material (to do the animation on the instances) the fragment shader which controls the color of the material will overwrite any previous colors you’ve given the instances.
So…assuming you want to continue to leverage thin instances for performance and use a node material for cool shader effects, you are forced to handle the unique coloring of each instance inside the shader itself.
I wish I could tell you that this is an easy thing to do, but (for me at least) it took some mental gymnastics to figure out.
Let’s start by looking at the playground:
Lines 22-34 handle the creation of the instance grid for us. Ignore line 23 for the moment. There are a few parameters here where you can adjust some properties to change the layout of the grid.
let gridSize = 64;
let boxDistance = 1.5;
let boxArray = [];

for(let x = -1 * (gridSize/2); x < gridSize/2; x++){
    for(let z = -1 * (gridSize/2); z < gridSize/2; z++){
        let matrix = BABYLON.Matrix.Translation(x*boxDistance, 0, z*boxDistance);
        boxArray.push(matrix);
    }
}

box.thinInstanceAdd(boxArray);
That’s actually everything we’re going to do in the playground (apart from line 23 which we’ll come back to).
EVERYTHING else is going to be done in the shader itself.
First as you’ve figured out, you have to add the instances node so the shader can understand that there are shared instances all using this material.

Notice that there is one very important ‘port’ on the instances node that we’re going to leverage to make this work, the “InstanceID” output port.

That is the magic sauce here. That single port gives us VERY limited access to each individual instance. Basically just a single unique ID. We’re going to pass this into a bit of math wizardry in the “uvManipulation” frame.

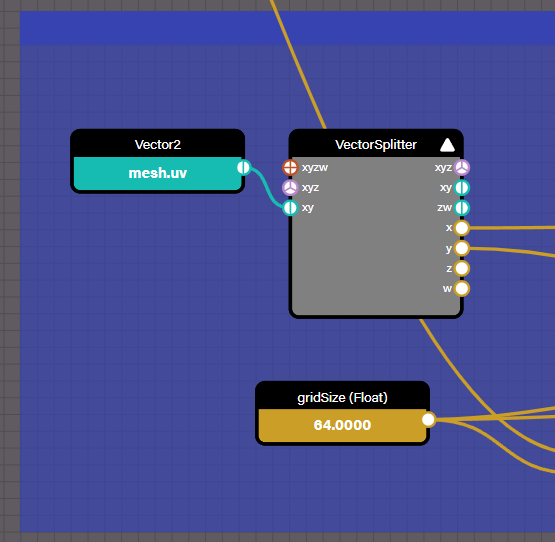
I won’t go too deep on the math here, but essentially what’s happening is we’re changing the UV range that will then be passed into a texture. Because we’re basing this math of the unique id of each instance the output manipulated UV range will be different for each instance. This is the key part of the puzzle. Unique input = Unique output.
The high level gist of what this is doing is it’s scaling the U input for the columns of the instance grid and then scaling the Y input for the rows of the instance grid. I wish I could explain this quickly, but it’s a bit complicated so you’ll just have to play with it and tear it apart to see how it all works.
So the unique output UV range for each instance is then passed into the exact same texture in the shader. That is connected to the fragment output and we’re left with each individual cube getting a unique UV range to project a unique part of the texture.

Ok remember line 23 that we ignored earlier?
boxMaterial.getBlockByName("gridSize").value = gridSize;
It’s critically important that the shader has the exact same input dimensions as the grid itself. This means that in order for us to dynamically change the amount of boxes in our grid, and have the correct part of the image texture displayed, we have to update the material to use the same gird dimensions. That’s what this line does. When the playground first runs it will load the node material and see what our gridSize variable is set to, and pass that exact same value to a float in the shader as the material is sent to the GPU.
WOW what a journey right? You certainly come right out of the gate swinging for a tough one.
I’ve come to learn that just about anything is possible inside of a Babylon Node Material with enough practice, as your understanding of it grows, I’d bet that some of these types of connections will start to become more clear as well.
I truly hope I’ve understood the core problem and offered a semi-understandable solution.
Cheers!

Jason! Thanks for the detailed reply!! but I think I already had that in the playground :S And then @Blake’s tip to use mesh color node worked perfectly!

https://nme.babylonjs.com/#NJLXCJ#18
See image result above:arrow_double_up: (the mesh already contained the color data from my normal code )
But inside the above NME file, I have noticed that my “Direction changing” nodes don’t seem to change the direction correctly… Do you know where I might be going wrong with that??
Note: my animation is offsetting the vectors in the Z-axis, contrary to your Lego Ocean tutorial that I followed.
Next challenge is on sorting out shadows cast from the NME object…
Jason I’m noticing a problem with the type of noise used in this tutorial OR perhaps in the way the noise is being mapped to the output.
See image of your “Fun with Lego’s” tutorial, where I have exaggerated the magnitude of offset of the noise. As you can see the Instances are all randomly offset in Y, however, Instances that are adjacent to one another are drastically different in Y-Position at any given time.

Below is perlin noise texture:

but as you can see each pixel is gradually darkening or lightening relative to its adjacent pixels, in both X and Y directions of the image texture. Presumably, if black-white is mapped 0-1 in the Y-axis of your lego tute, the waves of the ocean would result in movement that is gradual undulation, like this ocean image:

My question is why is this not the case with the NME nodes? It seems to have a chaotic pattern, completely different from the perlin noise image that is generated partway through the tutorial. I’m noticing this issue in my PG because I’m facing the same issue inherent in the Lego example/test.
I played about and I was able to get relative movement in one axis here, but it is moving like individual strings. Not a smooth, relative, ocean-like movement.

Previous version manage to get relative movement, but again, it was only in one direction:
Do you know why? Is it the wrong type of noise? Or is it a mapping issue, when mapping vertices to Thin Instances?
@roland Any ideas on overcoming this issue?
Update: Tried Brownian Noise in a slightly different setup. Did not help… Its still mapping the Y-axis animation without accounting for relative offset to adjacent instance (as explained above).
Current Playground:
Dude sorry, I’m so overhelmed at the moment that I am not able to help you right now. Maybe the next week. 
No problem man! I get it!!
@HirangaG you’re a tough guy to keep up with. LOL, seems like you’re making TONS of progress!
To close on subject one first. And just documenting this for future folks who might find this thread.
@Blake’s solution to the “how do you pass color information to a Node Material” question is awesome. Well done @Blake! I should have acknowledged that earlier. Also Blake’s solution is far less complicated to learn. Again, nice work @Blake.
I also realize that in my approach I made a pretty big assumption that I should have clarified earlier. Given the fact that you are using Thin Instances I’m making an assumption that performance is important to you. Offloading as much work as possible to the GPU being the most important lever on maximizing performance. After all, Babylon is an engine to do exactly that right…offload lots of processing to the GPU to get better performance for interactive web experiences. Ok so with that assumption now stated out loud, that I’m assuming performance is important, let’s dissect both approaches real fast.
Your current approach (which I’ll refer to as the step by step approach) for doing this looks something like this:
- Load a texture into the scene - CPU
- Calculate texture information into color information - CPU
- Assign color information to vertex color of the thin instances - CPU
- Pass color information through the Node Material - GPU (Blake’s awesome solve)
In this approach, it’s very simple because it breaks the problem apart into a series of steps. That’s a really good thing! After all when you’re learning a complex thing, breaking it down into smaller parts is the best way to learn it right? So again, BIG pros to this approach and kudos for your very fast progress in figuring it all out.
Ok now let’s lean into maximizing performance efficiency. If we take my assumption for earlier that performance is critically important (assumed based on the fact that we’re using Thin Instances here). Let’s look at the “straight shader” approach.
In the pure NME “straight shader” approach you’re steps look something like this:
- Load a texture into the scene - CPU
- Pass that texture connected to a shader to the GPU - GPU
The benefits of this approach are largely around scale. Since Babylon is NEVER GPU bound that means that ANYTHING that you can offload to the GPU is a performance optimization that saves you CPU cycles.
Two other things to consider - scale and repetition.
Let’s start with scale - Currently let’s say you’re using a few hundred thin instances to create this effect. Let’s also say that you’d like to be able to scale that number up to hundreds of thousands or even millions of thin instances. In the “step by step approach” we’re asking the CPU to do more work for us…as we scale up the number of thin instances this problem scales exponentially. As you create more thin instances, more calculation happens. In the “straight shader” approach any extra work required because of scale happens entirely on the GPU. a GPU is built for cranking out insanely high numbers of simultaneous operations so it’s actually a better way to scale our computation than the CPU.
Ok now let’s talk about repetition. Let’s say that you that you’d like to be able to change your texture in the middle of your interactive experience…something like the image for the hologram can change any time by the user. In the “step by step” approach every time the texture changes (no matter how many thin instances you have), we have to ask the CPU to recalculate the color steps all over again. In the “straight shader” approach, all you have to do is give the GPU the new texture and then it does it’s thing.
Ok so let’s recap. First and foremost, there is no single way to do anything. I’d even argue that there isn’t a “better” approach. Both the “step by step” approach AND the “straight shader” approach have their benefits. In the “step by step” approach you break the problem down into a series of steps that are much easier to learn one at a time. This approach requires the CPU to do more work for you. In the “straight shader” approach, it’s FAR more complicated to wrap your head around if you’re not familiar with shaders, but it has big advantages when thinking about performance.
@HirangaG I hope this is helpful to you and future readers.
Now onto your next problem…noise…I’ll have to get back to you on that one.
Thanks Jason! Yes this makes perfect sense and I think I have the new, more efficient diagram in my head now. I did start tapping down frame rate very quickly so this is something I should overhaul now!
I guess to ensure I structure my attack with all the above in mind:
- Scrap Thin Instances ( it did register AFTER using NME that this might be a duplication haha)
- NME
- Load texture from url
New to me in NME - Split into pixel colour
- Make new mesh instance in NME?/ Array these according parameter in the code.
- Apply colour to each cube according to location??
- Apply animation position offsets with noise
- Output into screen.
Additional to that section of stuff I’ve got no idea of how to build in NME, I was wondering if/how to access texture url (dynamically swap the url, as you predicted in your example haha) ?
Also, I want to achieve similar effect with text objects, that receive dynamic data too - can text be manipulated in similar fashion for efficiency in NME?
Swapping textures in NME is super easy. You just read the imageSourceBlock by name:
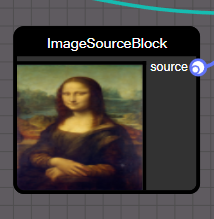
And then you set the .texture property of that block to whatever new texture you want. It’s that simple.
Text - I haven’t tried that, so I’m speaking out of ignorance here, but the functional approach should largely be the same. Do as much as you possibly can in the shader to maximize performance.
Yes you’ve got it. You want to create thin instances of an object AFTER you’ve assigned the the Node Material to the original master object. This will insure that each instance of that object is created using the same node material.
I’m not sure I understand steps 4 and 5 in what you’re proposing.
I see it more like this.
- Create a box (or whatever your master mesh is)
- Load your texture
- Create your node material
3a - You must use the instances node
3b - Use a texture node.
3c - Give each box instance a different part of the texture to render as it’s “color”. Do this by changing the UVs of each box according to it’s instanceID (from the instances node) and it’s location in your grid.
3d - Create whatever motion/effects you want for the entire grid. - Assign your node material to your box
- Assign your loaded texture to the imageSourceBlock used in your Node Material (You can do this in code)
- Make thin instances of your box.
- Changing the image shown on your gid is as simple as swapping out the texture assigned to the .texture property of the imageSourceBlock (You can do this dynamically in code any time you like)
Jason, when you say Create a Box, in the normal Code, do you go ahead and
A) create single mesh (and create the instancing of this mesh in NME?)
OR
B) do you create the single mesh PLUS the thin instance code, before then doing the NME work?
Ok… im part way there but img is messed up:
- rotated incorrectly and
- not scaled 1 pixel to 1 cube for some reason (compared to previous method).
Also… I’m not yet seeing efficiency difference in the frame rate … Is my code ok or still doubling up something compared with previous method?
I commented out the bits the are not required anymore with NME.
See updates: https://playground.babylonjs.com/#DNMA77#7
It looks like where the performance boost would be felt is at startup and whenever the texture is changed, since the one-time (per texture) cost of iterating over the texture’s pixels to create the color buffer was eliminated.
PS I tried checking out the latest PG but the tab freezes up on me…
PS PS Can’t wait to see how it turns out. ![]()
Oh - what freezes up!?
Blake, on subject of efficiency, you may have noticed I create two instances to create two NME animations. In fact they are both same with a very slight difference. Is it possible to combine the two into one NME, with an output of two variations on the one Thin Instance mesh set?
IE. 100 instances meshes, are affected by NME to result in 200 instances.
Possible? Or do I need to do it this way, creating 2 TI’s? @PirateJC ?
The frame rate is so low I can’t even scroll the code editor to read over the code and see what’s going on… Maybe it’s only an issue on MacBooks? IDK…
I think you would need 200 thin instances thou, since the vertex shader can’t create extra vertices for the duplicate thin instance and the fragment shader can only draw one pixel, AFAIK… Maybe you could use an attribute to control which animation to do and use just one set of 200 thin instances, IDK if it would be faster thou…
Okay. update @PirateJC @Blake @labris
Fixed:
- Image Rotation
- Image Normal
- Image Transform and scale to get the image centered, based on the pixelsize and pixelspacing variable (not yet hooked up to my normal code, but the bones its labelled in the two NME’s)
Problems:
- I’m noticing load times stretch out
 I’m not sure precisely how it compares to before but it is taking quite a while for anything to appear on screen.
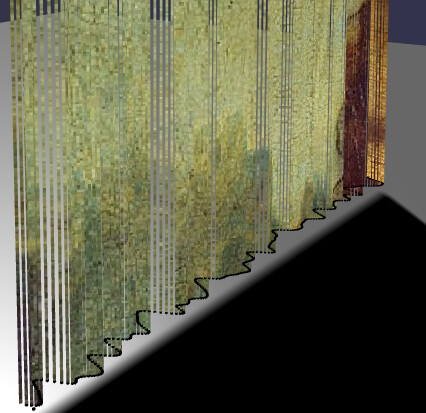
 - I’m also noticing that the Pixels (cubes) are having a colour applied to them as a texture map, rather than a solid color. I have set it up with the specific aim of each pixel of a 1920x1920 image, one cube in the model. This worked perfectly in the previous setup where the pixel color was read and applied to an array, and then to the Thin Instance Mesh, before entering NME.
The new method, that loads the image and allocates the image pixel colour to the corresponding cube/pixel instance appear to instead be allocating a texture (that seems to be interpolated from the original image! ) Meaning the pixel cubes no longer look like they’ve been perfectly divided, and equate to a single colors. They appear to have a gradients on them!
1 pixel from the image should equal 1 pixel cube in the resulting model.
*(there is also a factor variable to change this proportionately in whole numbers)
This image has a white, 1pixel wide frame superimposed around the border. As you can see, it is no longer sharp in the viewport, and you’ll notice the gradient/texture applied to some of the cubes:

So… there’s something going wrong in there… Also if it is applying a texture to each cube, that MAY be what is slowing the model down. It should be applying a color treatment only, and one which is “perfectly” extracted from the image, rather than interpolated/antialiased or whatever processing it may be doing (there should be none!).
Any ideas on where its going wrong?
PG: https://playground.babylonjs.com/#DNMA77#8
Just read your reply Blake. Some misunderstanding there on the Thin Instances:
The scenario I was explaining was using 1 thin instance + 1 cube mesh to create 100 cubes. With NME, i wanted to animate those 100 cubes in two different ways, and show them simultaneously >>> therefore 200 cubes in the view.
PS. In my actual model the TI is creating 1920x1920 cubes from 1 cube mesh, and I have run the TI twice, in order to achieve the above 2x affect (seeing as I don’t see a way for NME to duplicate meshes + 2 separate animations. NME seems to only be able to affect/modify meshes - it seems… I’d love a confirmation!)
But as mentioned… i have a feeling the color being applied as a Texture to each TInstanced Mesh may be the mega problem/slowdown…
Yep that’s the scenario I though you meant if I’m understanding it, but I still think you would need 200 thin instances to do that. For example 2 cubes each with a set of 100 thin instances, with each cube using a different copy of the shader material created from the same NME but using a uniform to control the animation. Or you could do one big set of 200 thin instances all of the same mesh, using an attribute to control and vary the animation… Those are the only ways I can think of to use the same NME for all your thin instances.
To use the nearest pixel’s color instead of LERPing between them you can try doing below in code:
nodeMaterial.getBlockByName("Texture").texture.samplingMode = BABYLON.Texture.NEAREST_SAMPLINGMODE;
I’m not sure I’m understanding you correctly in the thin instance bit, because I’m already achieving the effect with only 1 mesh, 2 thin instances and 2 NME, resulting in 1920x1920x2 number of animated cubes - this is confirmed as possible (unless I’m explaining it inaccurately/my definitions are jumbled haha :s )
In contrast, my question is if 1 mesh, 1 thin instance and 1 NME can result in 1920x1920x2 number of cubes? Is that possible?
Re. Sampling mode, if my resulting array of Instance match exactly with the array of pixels in my image, is there a way to map the colours directly without any sampling per se? When you say ‘nearest pixel’ I imagine the sampler could potentially skip a row of pixels because of alignment difference or something. I need to read more on lerping, but looking to precisely copy and paste the pixel values to each corresponding instance, than “sample”, if possible?