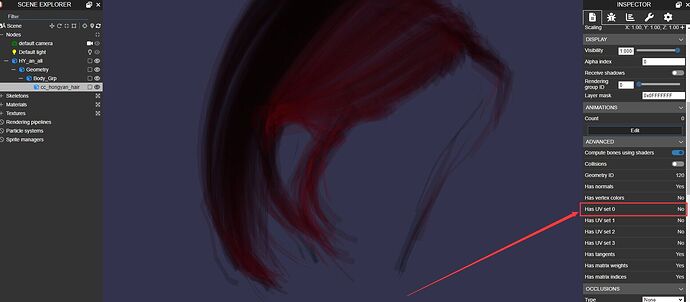
When I want to export model from maya to babylon file, the uv of the model in babylon is missing and the model is tranparent.
The uv is normal in maya.
maya file is as follow.
The uv is missing in babylon and the model is tranparent.
After change material, the model can be visible.
How to use maya to export correct babylon file?
@PatrickRyan Is there any method to solve this problem?
@xiaopangoo, I am not able to reproduce your problem and want to make sure I am doing it the same as you. I have your mesh open in Maya 2023 and note your lambert material which is assigned:
Checking your UVs, they appear like your image:
I export to a .babylon file, note that in the log window, the exported material is noted and is shown as the single exported material. Note I am using build v20230608.5 of the Babylon exporter.
When I load the file in the sandbox, I see the mesh and material as expected:
I don’t need to change the material at all, so I know that the material is correctly linked in the .babylon file. Are you having this problem in the sandbox? Is it showing up in your local build? If it’s not working in your local build, can you try your export pipeline and drop the results in the sandbox to see if there’s a difference? What versions of Maya and/or the exporter are you using?
I tried to use maya2023 and v20230608.5 of the Babylon exporter to export babylon, but I can’t get the same result and get failed. Can you upload the correct babylon file exported from your maya?
@PatrickRyan
@xiaopangoo, I’m happy to upload the Babylon file so you can validate if it indeed looks right. I didn’t catch the warning in the export log about the UV set failing to export before… thank you for uploading your image.
I am not sure why I was able to get the hair to render as it seems it should, but what I can say is that every UV set needs every vertex mapped to it. The exporter - and I believe glTF in general, but I may be mistaken here - requires every vertex in a mesh be present in every UV set. We have a blog post about a product customizer that talks about making multiple UV sets and how to handle mapping all vertices to every UV set when some vertices should not be mapped to a specific texture. I think, in your case, this is less a matter of some vertices aren’t needed in a specific texture and needing to hide the shells and more about some hair cards were just missed in the UV mapping process.
When I marquee select all UV faces in your UV layout, there are still some cards that have faces unselected in the scene. You can see a cluster of them in the image below by either the black backface or the grey front face where all other faces have the orange selection color on them.
If I hide those selected faces, this is what I am left with:
These vertices are not mapped in your UV set and this is why the UV export is failing. I can’t explain why I am still getting the faces to render without a full UV set, but I am unfamiliar with how it is supposed to render, so maybe this is still rendering incorrectly for what was authored. However, just mapping the rest of the cards to your main UV set should fix the UV export problem.
hairTest.zip (6.2 MB)
The uv of hair is still null. Is this right?
This is where I am unsure why we are seeing anything at all if the UV didn’t export correctly. If you add the rest of the un-UVed cards to your UV set, you should fix the problem and get an accurate export.


