Reflection with png or jpg

I am looking for a way to use a png or jpg image as the reflection texture of the PBR material.

From what I read, this is always better to use .dds, .hdr or .env file for reflection. But for simplicity purpose, we really need to make it work with a png or jpg.

But when you set the reflection texture, roughness and metallic doesn’t work properly anymore:
https://www.babylonjs-playground.com/indexStable.html#2FDQT5#99
When it is supposed to give that result:
https://www.babylonjs-playground.com/indexStable.html#2FDQT5#98

So I was wondering if a property on the PBRmaterial or on the reflectionTexture could make the roughness and metallic more correct while still using a basic image file.

@sebavan :wink:

Unfortunately, it is not possible and the environment maps needs to be preprocessed to have the roughness correct.

Ok so what are our solutions then?

Can we custom the shader itself to make it at least kind of work?
Is there a way to easily transform png to dds even if not perfectly preprocessed?
Or maybe another texture or parameter than reflection will give the almost same result?

We don’t need the reflection to be perfect but what matters is that we have the correct roughness effect.

To have the correct roughness, you need to preprocess your environment file with the process below:

https://doc.babylonjs.com/how_to/use_hdr_environment

I am not that uptodate with texture tools but I guess you could use gimp or PS to convert. (found this online: YouTube )

Adding @PatrickRyan for the tooling side as he would be way more aware than me.

1 Like

@PichouPichou, forgive me if I am going over things that you already know, but I find it’s helpful to explain everything that is going on for others that may see this thread. There is no way for us to calculate the contribution of the IBL based on the roughness of an individual pixel which changes the amount of the environment we sample to derive the final light contribution in real time on a phone. While I would love for real time ray tracing to be a thing we can get on all devices, we don’t have that kind of power right now so we are using a trick to simulate a ray-traced IBL solution.

What we do is precompute the environment texture in to 8 mip levels which reduce the number of pixels with each mip, effectively averaging tones across the texture. So if we start with a 512 px x 512 px image from one of the faces of the cube map, you will get resolutions of 512 x 512, 256 x 256, 128 x 128, 64 x 64, 32 x 32, 16 x 16, 8 x 8, and 4 x 4 pixels per face for the mip levels. See the image below which illustrates the averaging of colors on a face which saves us the calculations of the specular lobe based on the roughness of the pixel.

Then we will use those images to determine the environment lighting contribution for each pixel based on roughness which will smooth out the detail of the reflection on rough surfaces.

You can certainly start with a PNG or JPG for your environment as a panorama, or equirectangular, image like this one which is from a render out of Maya:

I would suggest using at least 16-bit png or jpg files so that you can get HDR pixels into the image so that you can simulate real light in an environment, but I tend to use 32-bit exr files to make sure I have a great source of data to export our environments with.

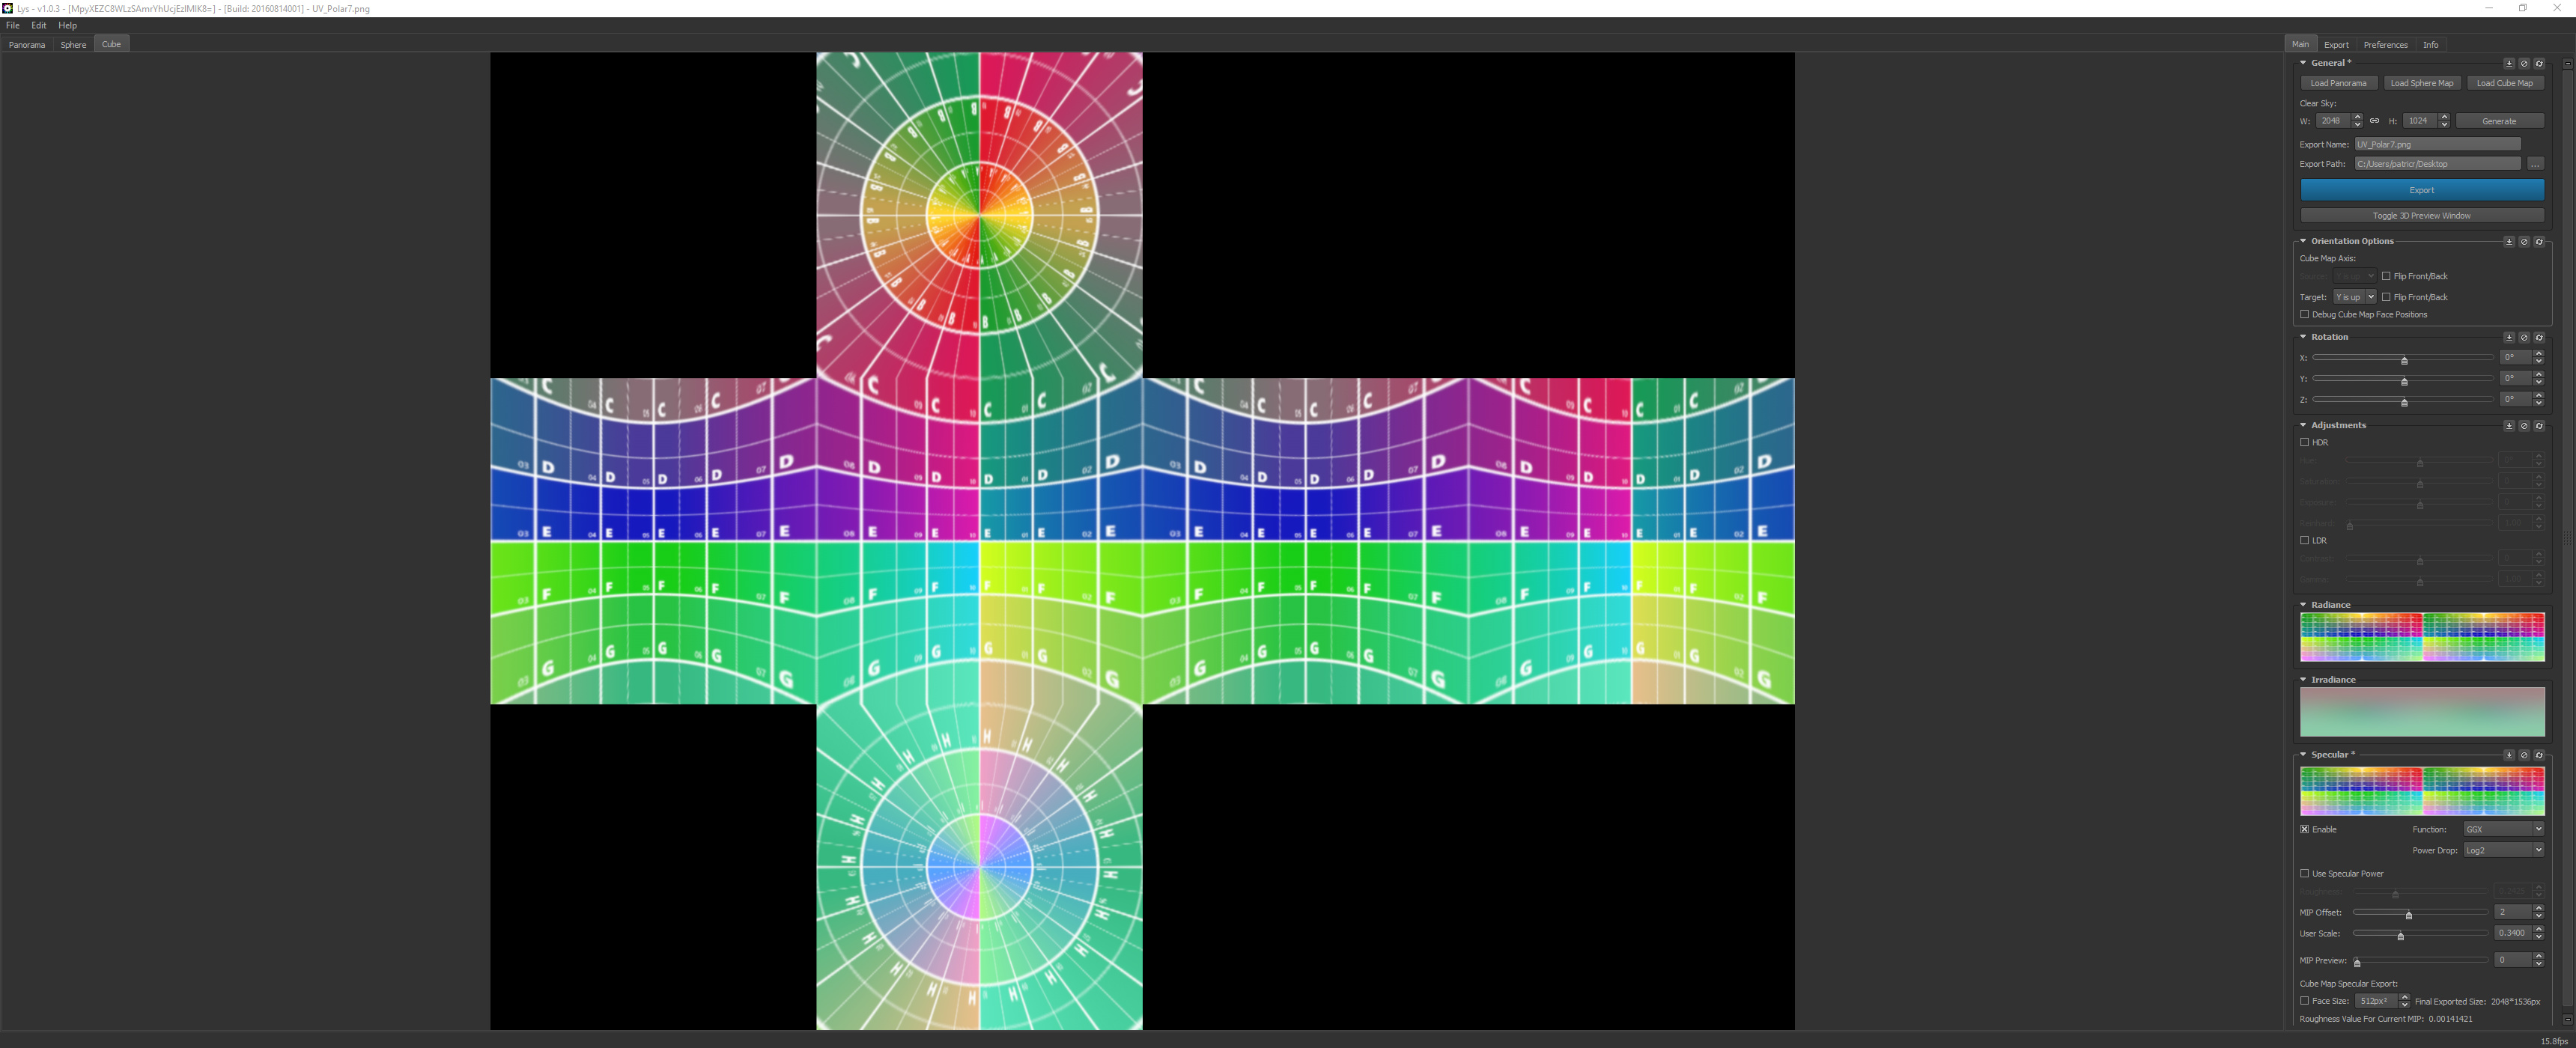
Then it’s a simple process of using Lys or IBLBaker at the link that @sebavan posted above. The reason you want to use this tool is twofold. The first is that it will take your panorama shot and create a cube map for you without visible seams. The second is that it does all of the mip calculations for you and will save them into the DDS format we are looking for.

If you are creating a custom environment by hand and don’t have the ability to render an equirectangular image, here is a method that you can use to do it:

  • First create whatever texture you want at a 2 x 1 ratio, the larger the better because we will be distorting the image. for this demonstration I am using a UV map so that you can see what is going on with the distortion.

  • You want to flatten the image and then use the Polar Coordinates filter on the image.

  • When the dialog window opens, choose Rectangular to Polar and hit OK.
    polarSettings

  • You will then want to use the clone stamp or heal brush to repair any seams you find at the center of the image where the conversion of the top edge pixels can be seen. This is only necessary if you see any pixels that don’t match up.

  • Then you will run the Polar Coordinates again and choose Polar to Rectangular to unwrap the image, but build in the polar distortion you will need for your environment.

  • You will note that the bottom edge is not distorted. To accomplish this, you need to rotate the image 180 degrees and go through the previous steps again… Rectangular to Polar, clone seams, Polar to rectangular and then rotate the image to the correct orientation.

Then you are ready to bring the image into one of the tools, my favorite is Lys but IBLBaker is free. You will see that your image now wraps correctly in a spherical projection.

And the most important thing is that the software will take care of creating your cube map for you.

I can understand your hesitation to move to DDS files as they aren’t easy to open or edit, Visual Studio is one package that can but there aren’t many and fewer with the legacy DDS headers enabled like Babylon requires. However, I typically don’t open DDS files once they are created as I keep the source files in PSD or PNG format for edits. It’s very quick to run a file through Lys so that is not a major concern in our pipeline. I can convert a file in less than a minute because I’ve done them so many times.

I hope this helps answer some questions or gives you some methods to try out. Unfortunately, without the mip chain in the file we aren’t able to effectively calculate roughness for reflections and have tried to support free tools to get you there. However, even buying a full license of Lys is not too expensive and will pay for itself even just for the quick conversion to cube maps for IBL or Skyboxes.

Let me know if you have more questions or concerns.

8 Likes

Wowww Thanks @PatrickRyan for the very clear and detailed answer!

I am sure it will help a lot of people like to me to really understand how this part of the PBR works and why.

I even feel like we could copy/paste your explanation somewhere in the babylonjs documentation linked to what @sebavan shared before: Use a HDR environment (for PBR) - Babylon.js Documentation

Back to my issue. To give you context, we create the tool Naker to make 3D creation easy. And clearly what you explain is awesome but this is not easy :sweat_smile:!
That is why we want to be able to have correct roughness on PBR material while using a png. Because we don’t want to ask our user to go through all those steps in order to have something working.
For instance, we simply decided to remove sky texture from the scene created in Naker because if you don’t have really detailed hdr or dds images, it just doesn’t work. But we really want to use PBR for its obvious quality rendering.

And we don’t need the PBR reflection to be perfect but at least to have the correct roughness and from what I read in your answer, this is mainly 8 mip levels which matters?
So what I am looking for exactly is a trick to transform a basic image on the fly in order to make it work with PBR material.
I understand this won’t be easy but we like challenges here right? :hugs:

From my research I found some file converter which could help in my mission:


There is also this tool which pixelise images that could help me create the mip levels:

Any other idea is really appreciated and again really big thanks for your explanation.
Cheers, Pichou

While continuing my research I came accross the ReflectionProbe class which seems to do the trick if used properly. How to use Reflection Probes - Babylon.js Documentation

But I have also seen that this tool can be hard on machines, what do you think?

@PichouPichou, thank you for the context around what you are trying to solve. It really helps to look at Naker and see the problem set you are working in. Typically we see people wanting to create scenes that are realistically rendered and they want photo realism which requires some 3D knowledge. This is why my answer was very technical as we usually get people looking for absolute realism asking about these workflows. I agree that creating a tool for 3D creation aimed at people who don’t have 3D experience is a challenging problem and one that has a ton of pitfalls.

I experimented a bit with Naker and noticed that when you ask a user to upload an image, you store the image in their account, which is a perfect time to process their image into the format you need. There are two issues you need to tackle, creating a cube map and creating the mips. You could take any image and create a cubemap with it with some tooling. I found arepo to create a cubemap from a panorama which seemed to do a good job very quickly. I fed it this image, which is something I just happened to have on my desktop (notice it is not the correct 2:1 proportion:

Running it through the tool will give you some seams at the poles, but it generally works:

As to generating the mipchain, @sebavan would have more information about how we implemented our GGX algorithms for IBL lighting, but you will need to compute the mip with output that will be useful. We generate our mip chain with GGX Log2 algorithms in Lys with mip shift of 2 (leaving out 2x2 and 1x1 maps) and a user scale of 0.34 to move the middle roughness perceptual value to 0.5 roughness. Since IBLBaker is open source, you could look at how they are computing their mip chain although they are not using GGX.

If you are looking for the best experience for your user, it seems like you will need to take this generation of the environment on for them. Alternatively, you could just offer them a preset selection of environments that have already been computed for them to select from. This is what tools like Marmoset Toolbag do. They have several baseline environments to give a variety of looks, but still allow you to upload your own exr.

And to answer your question about reflection probes, they are very expensive as you are generating 6 images per frame and are meant to get reflections from other objects in the scene. The difference with the reflection probe is that they are only meant for reflections. They don’t confer lighting at all and are only for a reflective material in your scene to reflect other dynamic 3D objects in your scene. These are used so the scene can update the position of an object and have reflections also update at the same time like this image from Unity:

Notice in the left image that the sphere is only reflecting the environment map (skybox) and in the right, with the addition of a reflection probe, the reflection now sees the 3D geometry.

I hope this helps clarify more about your problem space. Please let me know if you have more questions.

1 Like

@PatrickRyan, thanks for trying Naker and better understand our needs.
Indeed make 3D creation easy is quite a challenge but thanks to babylonjs and its community, it will be doable in a near future!

Very nice project you found here as it tackles the first issue you mentioned. I wonder, if the file is a cubemap but still is a jpeg or png file, will it work with BABYLON.CubeTexture?
But this tool is perfect as it processes the image directly frontend using a canvas!

To get the mipmap, maybe I could use 8bit on the cubemap generated but I wouldn’t know how to use the pixelized images to create a reflection texture in BABYLON after.

About the reflection probes, it seems like a good solution too. Indeed it generates 6 images per frame but if I am not mistaken you can manage that behaviour with property:
probe.refreshRate = BABYLON.RenderTargetTexture.REFRESHRATE_RENDER_ONCE;

And then I suppose the reflection texture will be generated only once? Which would be perfect for us because we could simply generate the cubemap texture once based on the sky sphere around the scene for instance.

But you are saying that the generated reflection using probes will not have lightning and thus won’t confer the roughness effect we want on PBRMaterial right?
And indeed I can’t make probes work properly with PBR in this playground: https://www.babylonjs-playground.com/#KA93U#270

But on the other end, I found this playground which seems to make it work perfectly with the helmet without any particular action: https://www.babylonjs-playground.com/#10D6YT#166
So this project tells me that there must be a way to do what we need using probes right?

Thanks a lot for this very interesting and useful discussion! :wink:

@PichouPichou, I spoke with @Deltakosh about it and there was at some point a discussion to include lighting information in a reflection probe, but there has not been any movement on that work as a feature because there are some outstanding questions about how we would approach it. I would not rely on that as a solution at this point as it could give you some hiccups. You are correct that you can limit the reflection probe to render once, but there is still no IBL in it.

What you are seeing in the playground you sent over is incorrect behavior being masked by the helmet asset. As most of the asset is very reflective, it’s easy to miss the fact that the harmonics are off in the hoses. If you feed the reflectionProbe texture into the reflectionTexture as you are here, you are missing all of the harmonics information that PBR needs to render correctly. To quickly show this, I replaced the asset with the one I use for testing roughness and you can see that there are no roughness values being calculated.

The playground on the right has only IBL from a DDS texture in the scene and you can see roughness values from 0.0 to 1.0 at an interval of 0.1 per sphere. While it is not in the correct orientation in you playground, you can see that the metallic spheres are all roughness 0 and the dieletric materials are just rendering incorrectly as black spheres rather than white.

In your case, if you want local reflections, you still need both IBL for the PBR materials and a reflection probe for reflections. But if you are just trying to create IBL for your PBR materials, you can’t use a reflection probe at this time due to the harmonics not being calculated.

2 Likes

This could be close to Unity3D Light probes : I’m not sure if lighting info should be handled by reflectionProbe rather than specific lightingProbes? The probe placement could not be the same about what we want to reflect and what we want to get in our lighting ('don’t know, it’s just a idea on-the-fly). In the first time, these lighting probes could be static, and why not using a prerendered-cache file?

2 Likes

I agree that splitting lighting probe and reflection probe would be a good control to have. There are plenty of times we would want to split them. We will definitely keep having these conversations as we decide how to proceed with the technique which is definitely needed.

2 Likes

I didn’t know these two could be splited, maybe it would make your approach about it simplier @PatrickRyan ?

If you think about it, it would be very powerful for any BABYLONJS user. Because all that you explained @PatrickRyan would be resumed in making a reflection probe and a light probe once and we would have a reflexion texture ready for any scene.
Instead of going through all the steps you explained very well with a very specific landscape, we could create a correct reflection and in addition based on the current scene which would be perfect.

But I guess what makes it magical is what makes it really hard to add in BABYLONJS?

I am just starting to read about light probes and how it works. And indeed @Vinc3r, I immediately saw that one first difficulty would be to choose where to put the probes. If they have to be static, they must be linked to the sky mesh I guess?

If I can be to any help to make that subject go forward, tell me what I can look into or do. :wink:

1 Like

We have a plan to introduce some dynamic sampling for probes in 4.1 but it will unfortunately have to be limited to high end device as it requires at least 64 samples of the probe to work. This is the main limitation and one of the reason we are currently only supporting offline generation.

Hope that helps understanding the issue despite fixing it.

2 Likes

Hello everybody,

I am restarting that discussion to know if this is still planned to release the light probes feature in the 4.1 ?

Plus I was wondering if we could potentially have shadows based on light probes ? It would be even more powerful then!

Thanks :wink:

Nope, won t make it in 4.1 due to timing reasons. I am not sure there is a way to do shadow from it in most of the cases, it would be limited to lights.

But if you find one, feel free to share :slight_smile:

1 Like