Hey guys,
new here :). I’m currently migrating a Unity Project to Babylon.
I need to migrate some VFX which involve a basic distortion shader.
I want to achieve this using Node Material Editor since i can’t write/understand GLSL fully yet ![]()
Can someone help me out on this ? I found this awesome playground which basically achieves what i want, just without the use of a Node Material: https://playground.babylonjs.com/#P5HUDJ#11
any help appreciated ![]()
![]()
I do not think NME will be the right fit due to the shader complexity ![]() I guess you d be better reusing it as a shader material. But as I am mostly biased let s see what @PatrickRyan thinks ?
I guess you d be better reusing it as a shader material. But as I am mostly biased let s see what @PatrickRyan thinks ?
2 Likes
@Mirkowo, it really depends on what you are going for. If you simply want to distort the texture to make it appear that you are seeing refraction of the bottom of a pool in the water, you can achieve that simply with a node material that adds a noise texture into the UV coordinates of the texture. You can start with a simple texture like this debug texture:

And a simple perlin noise texture, ideally it would be a tiling texture, but in this example I grabbed a sample texture that does not happen to tile

You simply need to add the perlin noise values to the UV values you pass to the texture you want to distort, in this case the debug grid. You do want to make sure you target the fragment with the add node and not the vertex or you will only be adding at the vertices of the mesh rather than at the pixel level.

And then you can simply add an offset with time for the perlin noise UVs and get what appears to be a moving water distortion. And a simple scale node on the perlin noise will control the amount of distortion.

Hope this gets you started but feel free to ping with questions.
4 Likes
Thanks for taking your time to response ![]()
thats a neat start and i i get the concept of distorting UVs but what i want is a way to sample the scene color/depth (?) so i can then distort it
so everything rendered behind the plane looks refracted…
I know it might not be the right fit for a node material but it personally helps me learn a lot, i’ve build up a small library of custom blocks (f.e a different SimplexNoise Block), basically migrating some Unity Shader Graph Nodes since most VFX for the project im migrating are done with Unity Shader Graph including distortion effects.
Shader Graph is what i personally learned shaders with and i’m fascinated that NME comes so close to it and i want to keep on using it. It sounds a bit like an excuse to try to resort to NME but i need to make this as reusable/flexible as possible and personally speaking this would be via Node Materials since it has more than one use case in the game.
I hope i’m not too much of a plague with my “newbie” approach of this and hope you guys can continue helping me out… just trying to learn ![]()
this basically is what i want to have as custom block for the NME ![]()
https://docs.unity3d.com/Packages/com.unity.shadergraph@12.1/manual/Scene-Color-Node.html
@Mirkowo, thank you for the extra context around what you are trying to achieve. Let me work up an example using these parameters.
2 Likes
@Mirkowo, sorry for the delay in getting this example up. We ended up finding a bug in node material and needed to push that fix before I could share the example. But this is what we have for refracting another mesh in your scene:
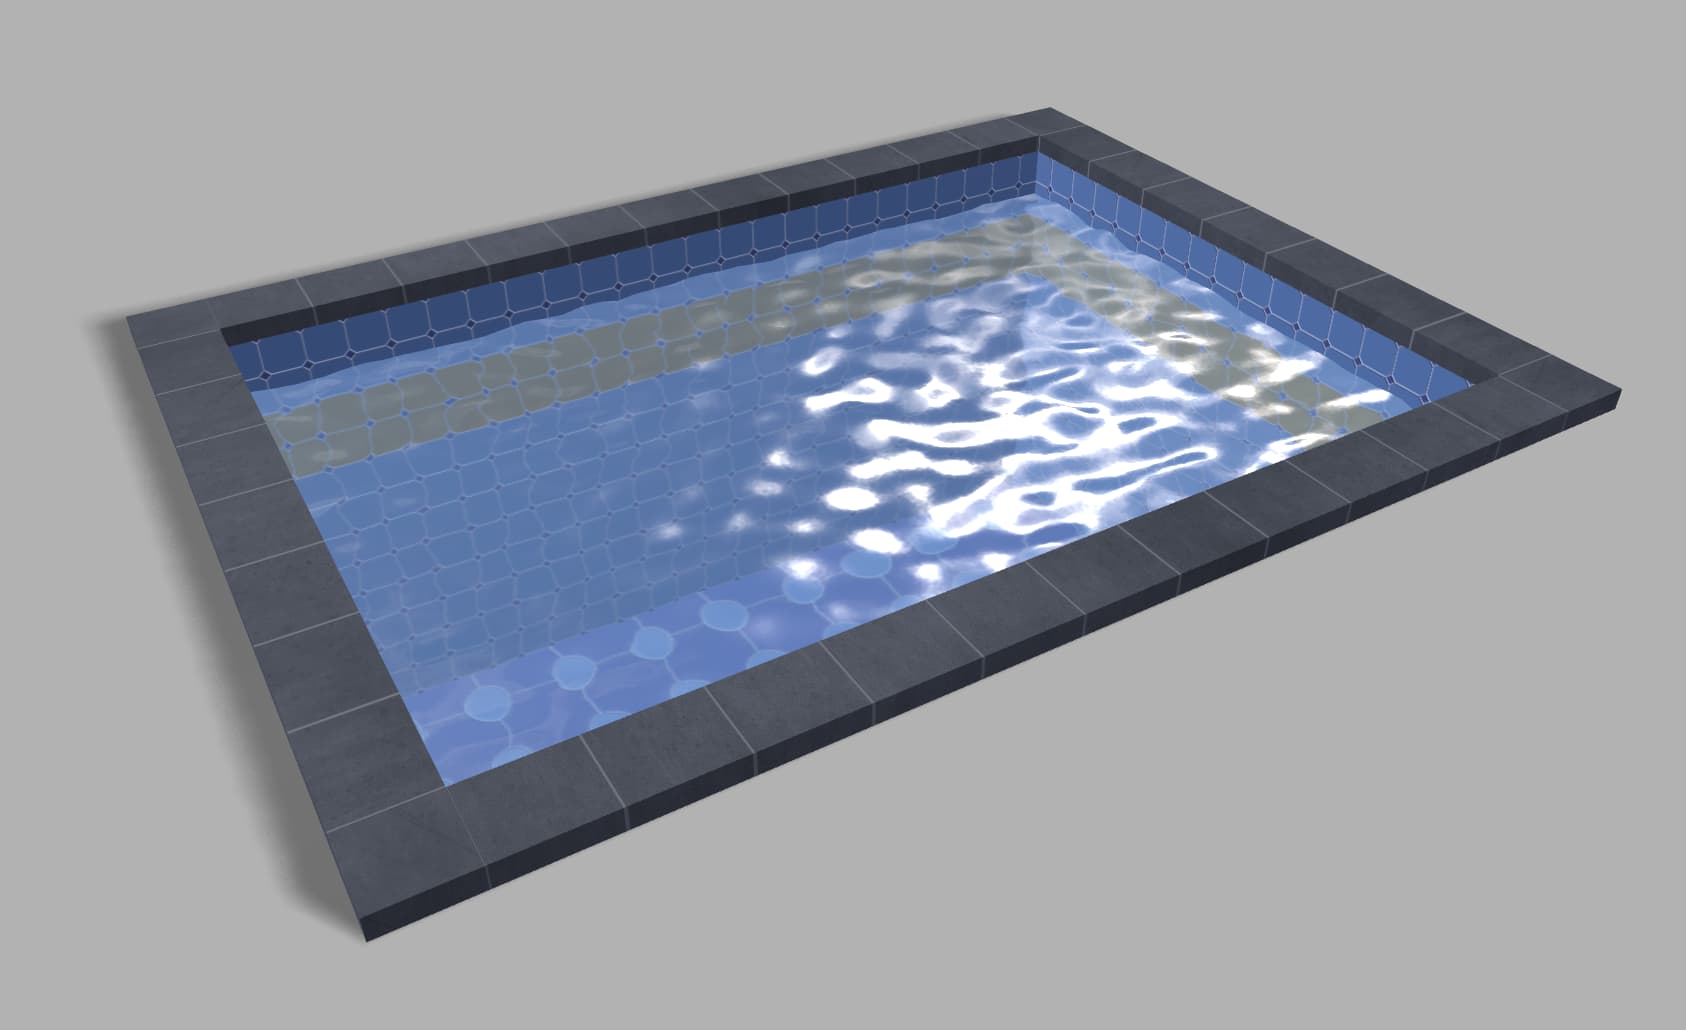
So let me break down the process of getting here. The constraints are that we need to have a shader applied to a plane that does a couple of things. The first is that it needs to do some vertex displacement to simulate a rippled surface. Second it needs to update the normals of the plane to accurately reflect the environment lighting. Third it needs to refract the mesh and textures of assets behind it. So I broke down the asset like this:

- A ground plane with a hole in the center so I could mask out the bottom of the pool in the view of the camera. It was also used to catch shadows from the scene. I would also create a simple shader so that it could render an unlit color that matched the clear color on the scene to make the scene feel finished
- A water plane that had enough resolution to displace and not look too jagged. This mesh will be what we apply our render target texture to.
- A pool cube that would be textured with a pattern that would easily show refraction when looking through the water plane.
- A tile rim for the pool to finish it and hide the open edges in the ground and pool meshes. This is set up as a separate mesh because we don’t want to push this into the render target texture, but it will still use the same material as the pool. More on this later.
Once we had the assets planned out, we needed to create a texture that we could apply to the pool. The ground mesh does not need a texture. But this was the quick Designer node graph to make the texture:

Note that the sides of the pool and each side of the rim are sharing UV space so that we can have more texel density. It’s difficult to see opposite sides of the pool interior at the same time, so we don’t lose visual quality by reusing the same texels on both mesh faces.
There was one more set of textures I needed to generate and that was a pair of tiling noise textures I needed this to be two sets of perlin noise with slightly different scale and disorder. To save on texture loads, I channel packed them into R and G of a single texture which we can separate out in the shader.

The other texture that I needed was a tangent space normal of the noise textures. This is so I can perturb the normal of the plane to get the correct reflections of the environment light. We could take the approach of calculating the normals using the noise textures as a height texture, but the quality will suffer in real time for a small asset close to the camera. So passing in normal textures gives us a better result, at the cost of more texture loads. To keep this to a minimum I also channel packed the normal textures in to one texture with R and G of the first normal texture in R and G of the packed texture and R and G of the second normal texture in B and A of the packed texture. We will calculate the B channels of both in the shader.
There is an argument to be made for loading two normal textures rather than a single packed texture and calculating the missing vector component. This is because there are square roots involved in calculating the missing channel, which may be more expensive per frame. Testing would be the way to land on the best performance option, but I wanted to show the example of packing here.
Now that we have the assets set up, we load them into the scene and create the new node materials. You had mentioned that you wanted a node like Unity’s scene color from your previous work. The way we handle something like scene color is a little different in Babylon.js, but it is powerful. To be able to refract the mesh and textures of the pool, we need to create a render target texture which can then be used as any normal texture would.
The reason the render target texture is powerful is because you can determine which meshes get drawn into the texture, which makes this a super useful technique. To add a mesh to the texture, you simply call:
renderTarget.renderList.push(mesh); // add a specific mesh to the RTT
In our case, I am only drawing the pool and ground in the RTT as I don’t want the water to refract the pool rim tiles. Now that we have the RTT made, we just need to apply it to the material on the water mesh. To do that, we will use the ScreenSpace block in NME for the UVs of the texture node the RTT is applied to. This will make the RTT render exactly as the camera sees it:

So with the RTT assigned to the texture block with screen space UVs and wired to a PBRMetallicRoughness block. we see a render like this one. I moved the water plane above the pool so you can see the RTT is not rendering the pool rim tiles, only the pool and ground with shadow. The lighter blue color comes from the environment map which has a blue sky on it. Note there is no alpha transparency here, but the RTT makes it appear as though we have a transparent mesh.

Then we simply add distortion to the screen space UVs with the noise textures we brought into the scene. I am using Time to offset the UVs for each noise node in opposite diagonal directions from each other than then applying Max to them. This makes the water feel more like there are ripples bouncing around rather than flowing like a river. At this point, I also multiplied a color onto the RTT to tint the water as I needed.

The last step is to do displacement and add in the normal textures to reflect the light. The normals have their missing channel recalculated with:

And they have the same animation applied to their UVs. The noise textures that we distort the RTT with are also used to add to the Y position of the vertices in the mesh. This makes the displacement, distortion, and reflection of environment light all sync up as though they are all controlled by the water surface.
So that sums up the process of making a refraction shader in NME with this playground. The code and shader should give you a basis to build upon for your scene. I hope this helps, but feel free to reach out with more questions.
5 Likes
This is exactly what i was looking for ![]()
also thanks for all the detailed explanations + designer insights, always nice to see ![]()
Accurate lighting diffusion on top of what i was asking for even… absolutely nice work!
Thank you so much.
I don’t think i have any more questions regarding this, RTT is indeed powerful ![]()
Can’t wait to show off some results soon ![]()
1 Like