I’ve also posted this in the discord so I apologize for any redundancy.
Wondering if someone here might have an intuitive understanding of what they are seeing. I’m having an issue where my lightmaps appear incorrect, or even “clipped” if you will. Our pipeline involves exporting from unity as a glb, going through our blender plugin which extracts the unity-made lightmaps and puts them into a mesh object’s materials so that we can pass them into our project (babylon is just our renderer) and below is what I see. Initially I thought the issue was the lightmap mode but all 3 end up with this artifact in some form. It’s a little difficult to describe so I will add some pictures. I am leaning towards colorspace. One thing to note is that the lightmaps are exr files and blender imports them in with a linear Rec.709 colorspace, but I’m not sure what happens during export to glb.
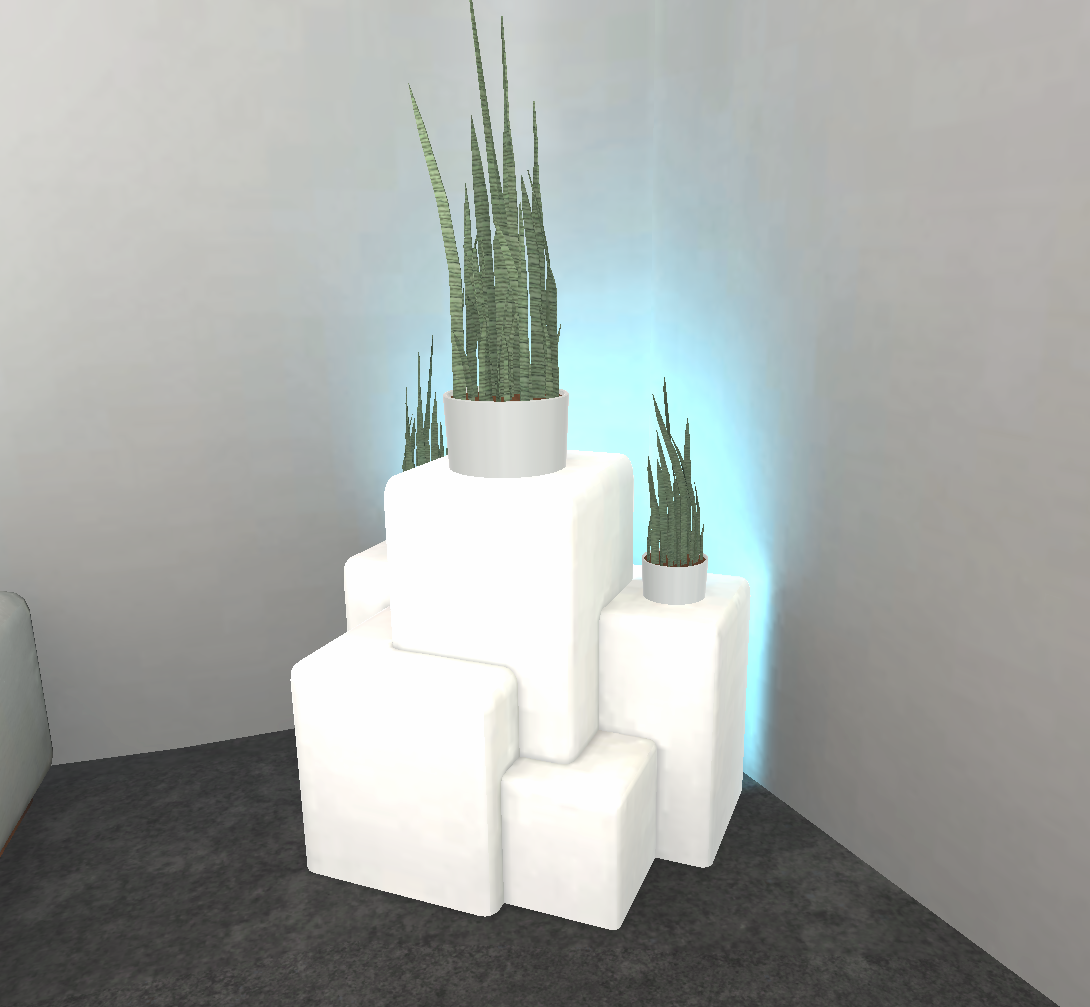
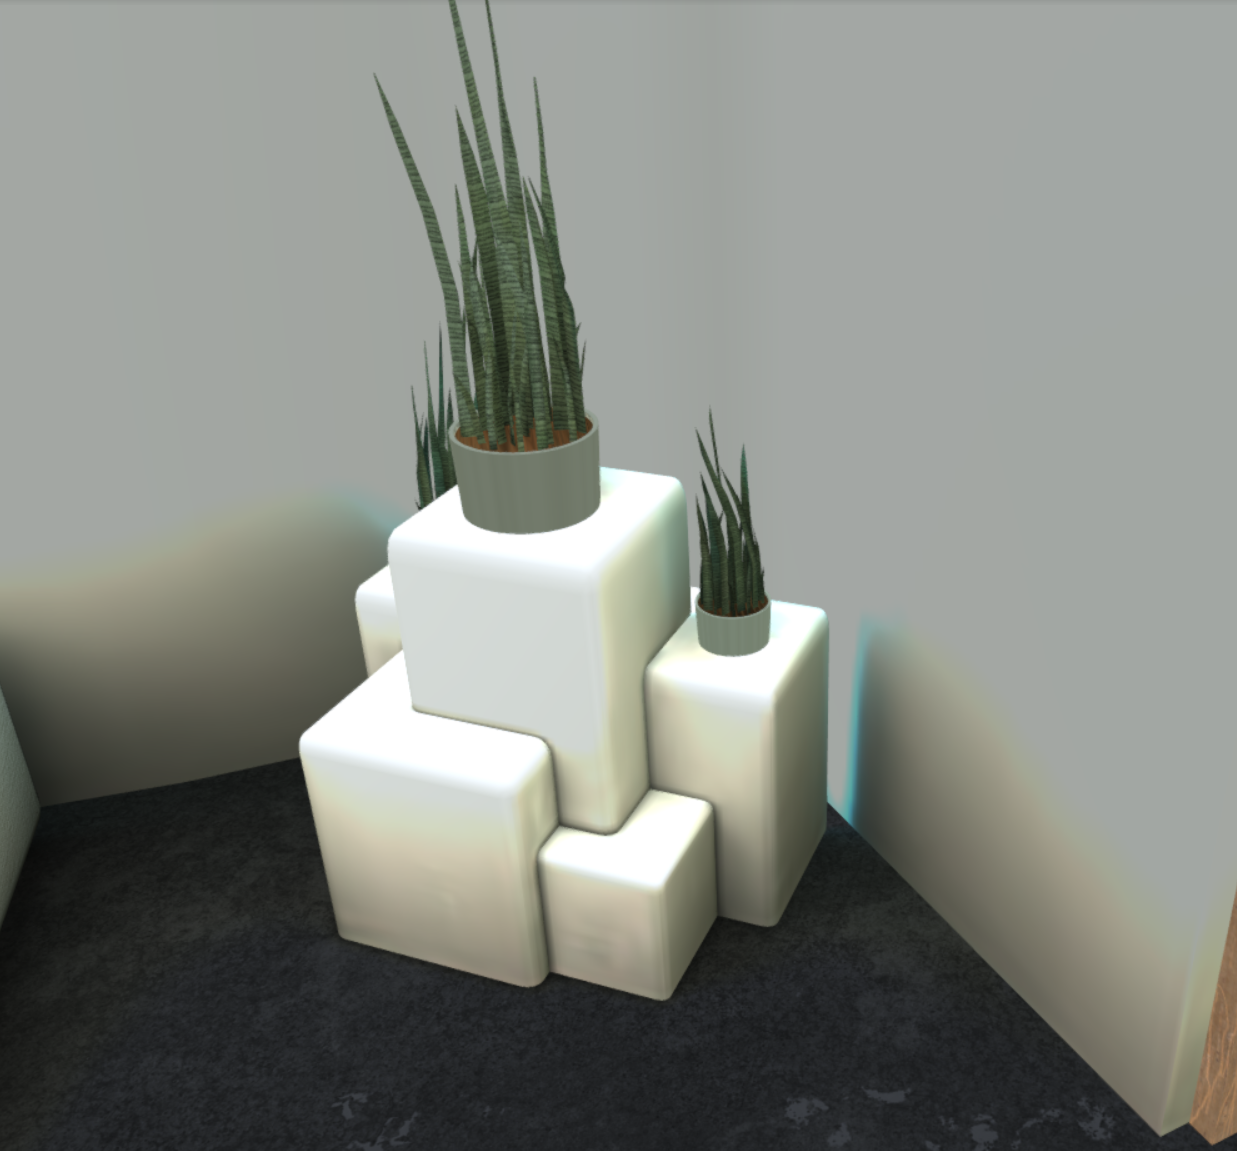
The top image is unity and the bottom is within our project. Note how the blue light behind the plant seems to be “clipped”
@Aitolda, can I ask you a few questions about the files? Neither glTF nor Babylon have .exr support so they are likely being converted to png or jpg depending on how they are wired to the material. I am unfamiliar with the flow you describe so please correct any assumptions I’ve made. The easiest way to tell what’s going on is to export to glTF instead of glb so that you can just look at the exported texture. My guess is that your lightmap has HDR values for the blue light that are getting clipped at 1.0 per channel. It also looks like you are using useLightmapAsShadowmap = true since your shadows are being multiplied on the wall material. If not, the lightmap is an add function so your shadows wouldn’t show.
I would check your lightmap first and see if your values are indeed being clipped. If so, I would then take your original .exr into Photoshop, GIMP, or any other editor and convert the file from high dynamic range to low dynamic range manually. This way you can control the conversion so your values aren’t just clamped at 1.0. Then to make the lightmap look more like what Unity does, I would set Texture.level on the lightmap in Babylon to 2.0 and then set useLightmapAsShadowMap = true on your material. What this does is mimic what Unity does with LDR lightmaps making a 0-1 range into a 0-2 range and then doing a multiply. In essence it turns the multiply operation of the shadowmap into a multiply for values under 0.5 and an add operation for values over 0.5 so you will get darker shadows and brighter lights in one go.
I hope this helps, but please ping me with any incorrect assumptions I’ve made or additional questions you have.
Probably no surprise here, but I have confirmed the process of saving to a gltf does indeed clip the dynamic range as you suspected (converting to png). So as far as taking it into gimp or photoshop, I’m actually automating a direct path from unity through blender (via script) to our project, so I’m limited to it’s (Blender’s) built in color correction tools. The best result I’ve gotten so far as to take the exr, and in blender’s compositor use the convert colorspace node from “Linear Rec.709” to “sRGB” then add an exposure node set to -1 to correct for the cropping, saving that to a png, and than simulating what I hope can be achieved in Babylon, with an rgb curve and a value of 2.0. This is roughed in by hand atm. Note: that the value control isn’t really an exposure equivalent, but was close enough for this demonstration of squashing it and stretching it back out. At the end of the day we are putting everything through a glb, including the lightmaps (we already have the path functional).
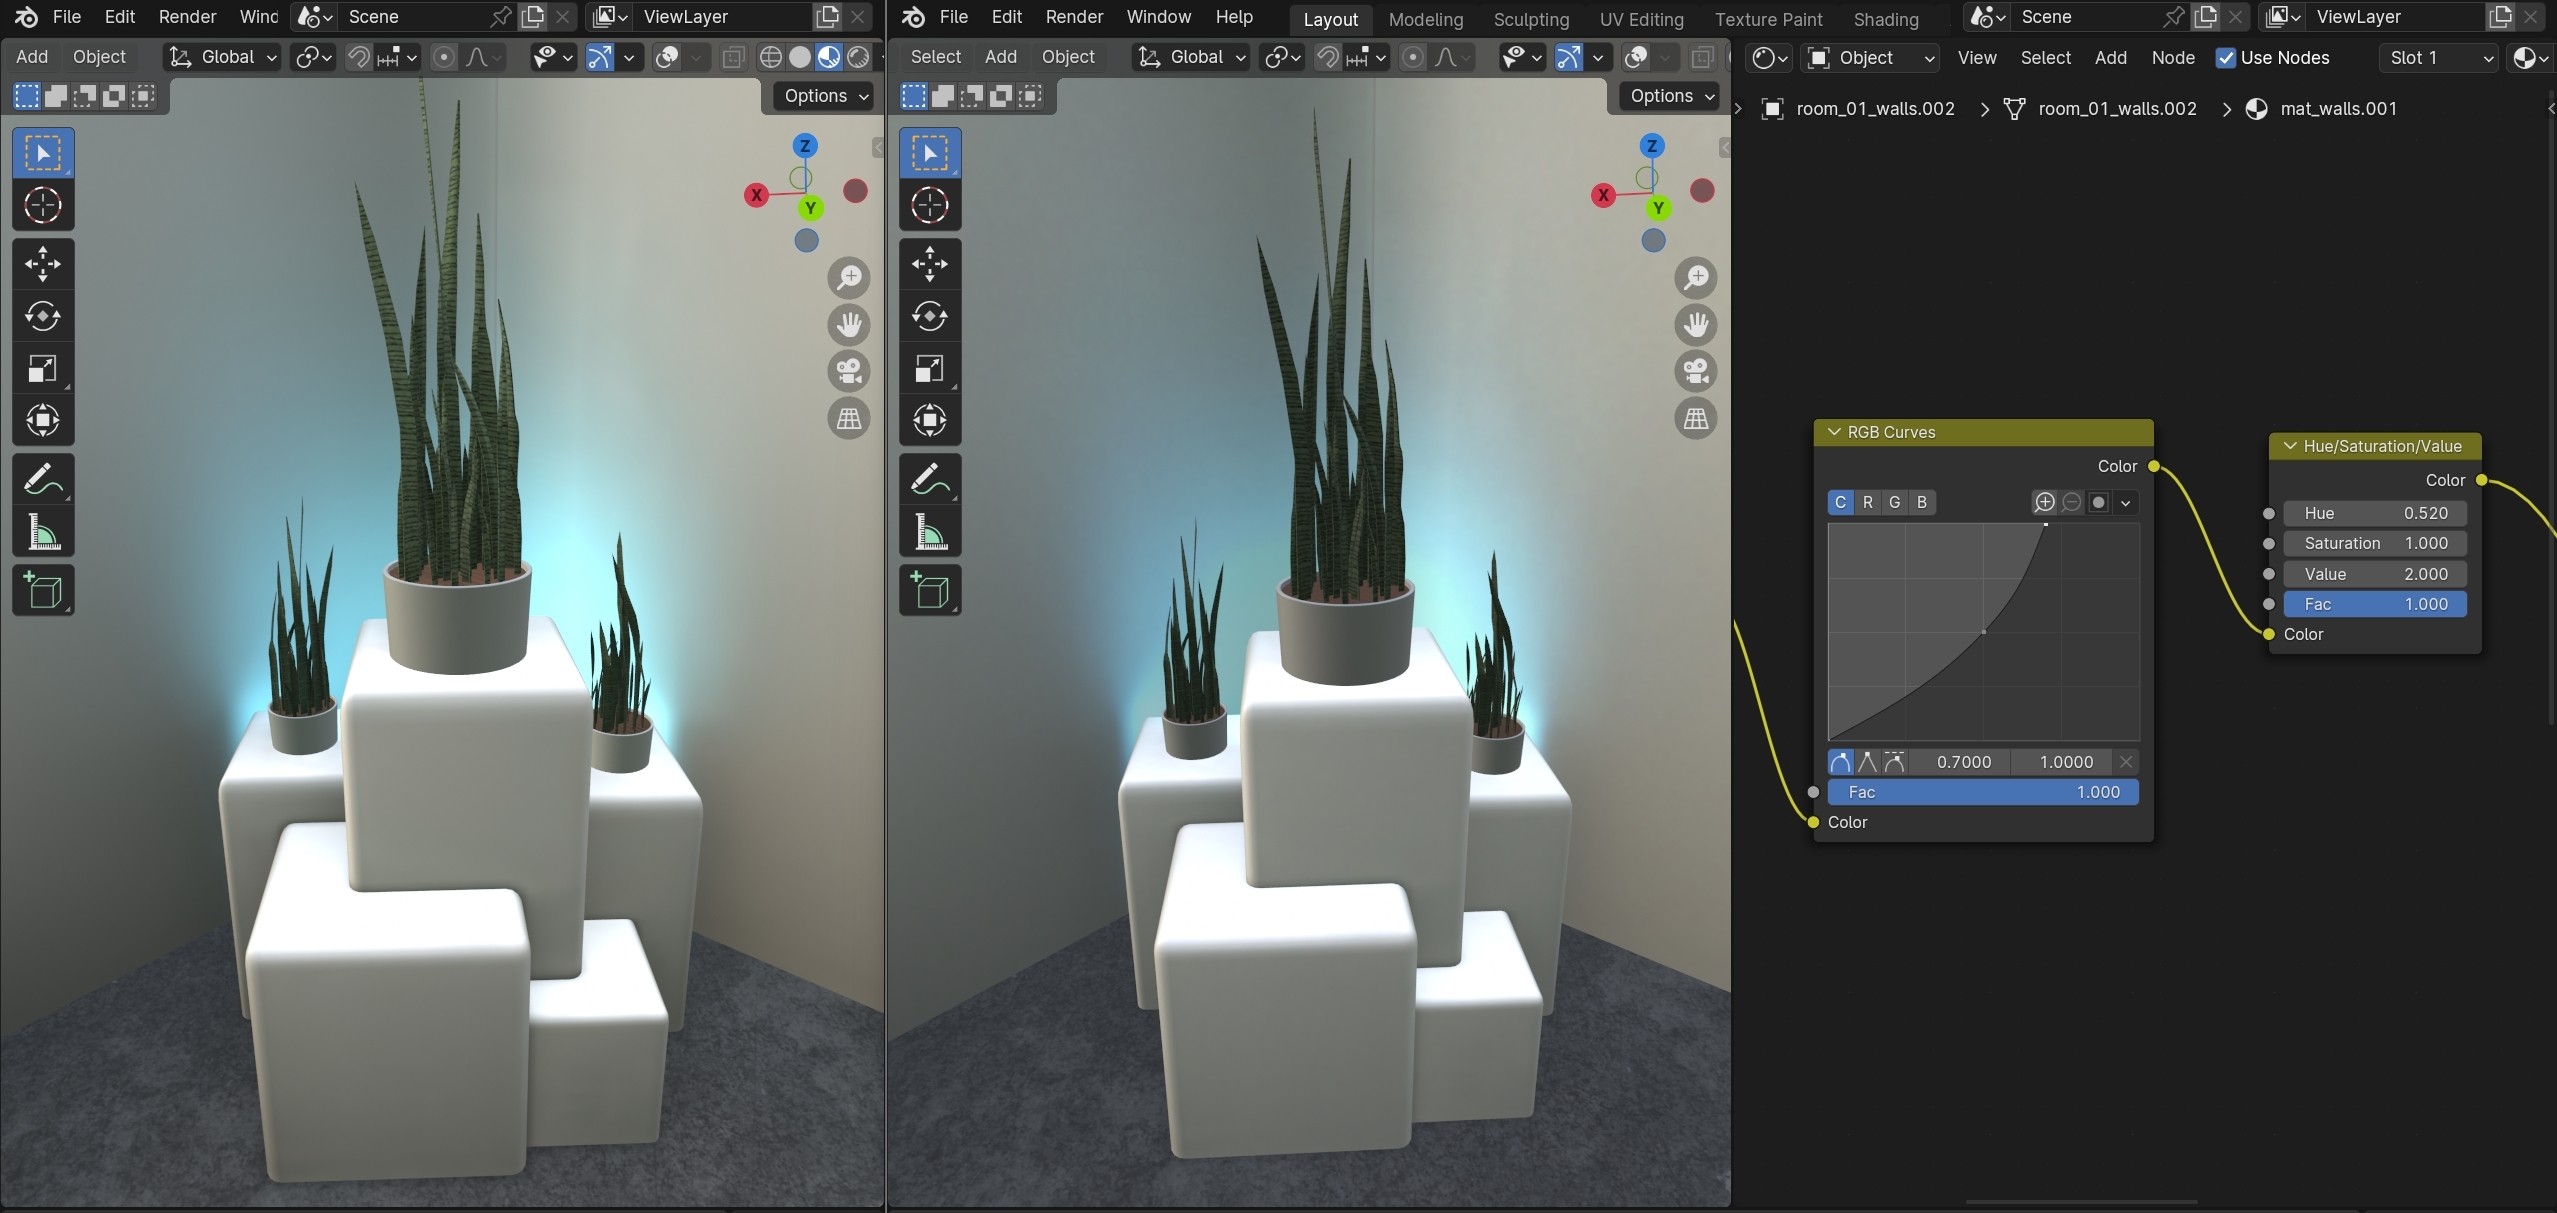
1st image represents a rough exr to png path, the 2 image Has the original linear exr as a lightmap on the left and the simulated expansion back from the png on the right.
Based on your suggestions, this would be the more precise way. I did also confirm that blender’s Linear to sRGB converter seems to be a simple gamma pass of 0.45454545, so combining that with math nodes, I can simply do the reverse in babylon in theory.
@Aitolda, this sounds like a reasonable approach to the issue. I think, as you suggest, there will need to be some experimentation to dial in your squash and stretch of the dynamic range for the image. But I think this workflow will yield results for you especially for scripting the conversion. I hope this unblocks you, but feel free to ping back with more questions.
ok. I think we’re almost there. taking the “squashed” textures, telling babylon to use a colorspace of “gamma” on our lightmaps, and setting the level to 2.0, we are close. BUT, level seems to be pulling the dark colors up as well. So level isn’t quite it. We need to multiply it by 2. Do you have any idea what property that is? I’m looking at the texture settings and I’m not sure which property is equivalent.
https://doc.babylonjs.com/typedoc/classes/BABYLON.Texture
Can’t for the life of me figure out how to multiply the texture rgb values by 2 back in babylon’s, What property to even use. Your thoughts would be greatly appreciated.
ping @PatrickRyan
@Aitolda, the level of the texture is indeed a multiply, but it is multiplying every pixel by the level. What this does is remap the texture from 0-1 to 0-2. This means that all of the values that were originally 0-0.5 are now 0-1. This in effect does brighten your shadows a bit. If you are looking to keep the shadows the same you will need to split the pixels of the lightmap so that any pixel under 0.5 is not changed. You will need to create a custom material for that and I would go with node material since we have the editor. You will want something like this for the lightmap:
Basically, we are comparing the desaturated texture to a value of 0.5. For each pixel, if it is greater, we multiply the original by 2 and pass the product. Otherwise, we pass the original, unaltered pixel. You could also do something similar by taking all pixels under 0.5 and multiplying them with your final light contribution and taking all pixels over 0.5 and adding them to the final light contribution. But basically, if you want to not brighten your shadows to match an art target, you will need a custom shader to handle the light map in a way that does not brighten shadows.


